Author Topic: Home Built Electric: Korina DC Les Paul Special  (Read 5702 times)

Tugboat

  • Jr. Member
  • **
  • Posts: 74
Home Built Electric: Korina DC Les Paul Special
« on: March 12, 2013, 12:09:44 PM »
Not quite Taylor related but I've wanted to build a guitar for a number of years. Finally decided to do it so I thought I'd post my progress for those that are interested. May try an acoustic build next year if it turns out OK! It's going to be inspired by (not exactly a clone of) a Doublecut Gibson Les Paul Special with two P-90's.

Before rough cutting I decided to double check the flatness of both sides of the blank. I scribbled pencil lines then planed them off with my Stanley #6.


They planed off fine. Blank ended up at about 1.65" thick

Obligatory shaving picture (need to work on my sharpening a bit):


I then scribed the centerline, drew the centerline, then traced out the shape.


Since I have no bandsaw I had to make due with a jigsaw. So I bought one of these contraptions to hog out material. That's about all it's good for; I wouldn't be comfortable drilling out a bridge with it. It wobbles around and it ended up biting me in a few places. I'll get to that later. Here's an action shot:


Then I rough cut. My jigsaw cut the korina like butter:


Rough cut. Then I spent a couple hours with a shinto rasp and file to get it closer to the line.


Then I got out my portable router table and of course the electronics didn't work. You plug in your router to the table, then plug the table into an outlet. I decided to do it without the table and route it straight on top of the template since for safety reasons I didn't want to clamp the trigger on the router. A couple places it got crooked on me though. Rookie mistake #1. I need to get a bottom bearing bit tomorrow and finish it off. Here's progress so far, warts and all:

This side I'll be able to take a sanding block and blend in the blemishes.


A shot of where the router got crooked on me. I'll be able to blend this in with a sanding block as well.


This is on the bottom of the guitar. This is where the drill bit wobbled on me when I was drilling relief holes before rough cutting. The one on the right in the waist I'm thinking about patching in some scrap Korina. It's too deep to blend since it will get too close to the pickguard. The one on the left I'm not sure if I'm going to blend it in with a sanding block or patch it with some korina or korina dust and glue.


When I finish routing I'm just going to clamp the trigger on my router when hooked up to the router table. I should've done that anyways. Oh well. Where the router slipped it should be easy enough to blend in. Any additional input on how to fix my goofs?
2012 Taylor GA4
Homemade Ash/Maple Telecaster (Warmoth unfinished body/neck)
PRS Korina Singlecut SE
Homemade 1x10 5F1 circuit Tweed Champ clone

Tugboat

  • Jr. Member
  • **
  • Posts: 74
Re: Home Built Electric: Korina DC Les Paul Special
« Reply #1 on: March 12, 2013, 12:10:47 PM »
I feared the worst after seeing the goofs from the drill bit and router slip but they blended out very well! I picked up a bottom bearing router bit, finished out routing the sides, and started blending out the drill bit marks and router slip with a palm sander. Everything went OK until I got to the router slip on the upper LH horn. The sides started curving badly. I still had plenty of time to switch tactics so no harm no foul to this point.

Back up to this summer and I bought a Rigid Oscillating Spindle Sander to sand sides flat. It lasted 3 uses and then stopped turning. The motor would turn on when you flipped the switch but the spindle would not turn. Haven't been able to use it since after trying many times. This would've worked PERFECTLY for this. So on a lark I plugged it in and flipped the switch and it came back from the dead! I finished it out with the ROSS. I still need to do some touch-up work by hand on the sides, and to sand off the tape gunk from the top, but I have a guitar body! I LOVE the grain on this Korina! :dude:


Ignore the dog hair on this one. Funny thing is that I vacuumed this room yesterday.

« Last Edit: March 12, 2013, 12:13:27 PM by Tugboat »
2012 Taylor GA4
Homemade Ash/Maple Telecaster (Warmoth unfinished body/neck)
PRS Korina Singlecut SE
Homemade 1x10 5F1 circuit Tweed Champ clone

Nomad

  • Veteran Member
  • *****
  • Posts: 369
Re: Home Built Electric: Korina DC Les Paul Special
« Reply #2 on: March 12, 2013, 05:17:02 PM »
Cool project.

Interesting grain variation.

I'll definitely watch this one. I haven't built an electric is some time, so this is fun to see.

not darth

  • Veteran Member
  • *****
  • Posts: 356
  • Near the lake in Minnesota.
Re: Home Built Electric: Korina DC Les Paul Special
« Reply #3 on: March 13, 2013, 12:09:46 AM »
Cool project, I've always wanted to build a guitar, electric or acoustic, ever since Popular Mechanics had a Home Workshop guitar back in the 90's. 

One thing you could do, if those chewed up edges really bother you, is to find some thin (~1/8") flexible veneer strips of a nice wood and take the entire perimeter down another 1/8" and wrap the 'sides' of the guitar with the veneer striping.  Wouldn't work if you were going for a really rounded 'Strat-like" profile, but if you were mainly leaving the sides perpendicular to the face/back and merely rounding the edges it could end up being a neat accent.  Especially if you used a really contrasty wood like bloodwood or something. 
As an example of just one option, Lowes has iron-on Red Oak veneer in 2"by8foot rolls.
Looks like this:


Just a thought.

Lookin' good so far!
(I can't wait to see pics of the neck-work.)
:)
« Last Edit: March 13, 2013, 12:14:04 AM by not darth »
Member #34
I'm not darth.

Tugboat

  • Jr. Member
  • **
  • Posts: 74
Re: Home Built Electric: Korina DC Les Paul Special
« Reply #4 on: March 13, 2013, 06:39:40 AM »
Thanks for the suggestion but I ended up sanding them all out and blending them in.  8) Thankfully it worked out well! I aim to start the neck work this weekend. This weekend I hope to have the side profile of the neck roughed out, the headstock scarfed, and headstock ears glued so the neck can settle the next week or two before truing up the fretboard gluing surface, routing the truss rod channel, installing the truss rod, and gluing the fretboard.
2012 Taylor GA4
Homemade Ash/Maple Telecaster (Warmoth unfinished body/neck)
PRS Korina Singlecut SE
Homemade 1x10 5F1 circuit Tweed Champ clone

Tugboat

  • Jr. Member
  • **
  • Posts: 74
Re: Home Built Electric: Korina DC Les Paul Special
« Reply #5 on: March 17, 2013, 06:18:22 PM »
Spent the afternoon rough cutting the neck. Since I don't have a bandsaw I had to improvise a bit.

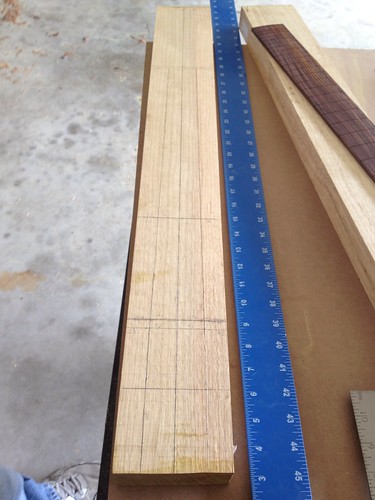
After scoring and drawing the centerline I marked out the nut location, sides of the neck, end of the fretboard, tenon and one cutting line on each side of the neck. I left 1/8" on each side to account for any inaccuracies when rough cutting as well as to give me wood on each side to trim the tenon to final shape before gluing it to the body. I gave plenty of space on the headstock and tenon ends as well so I can cut them down when ready.


My jury-rigged rough cutting jig. It's amazing what you can put together with a few dollars worth of good lumber from Lowe's, some clamps, good double stick tape, and a right angle square. The neck blank is secured to the MDF with double stick tape and then ripped with a circular saw. I cut one side:
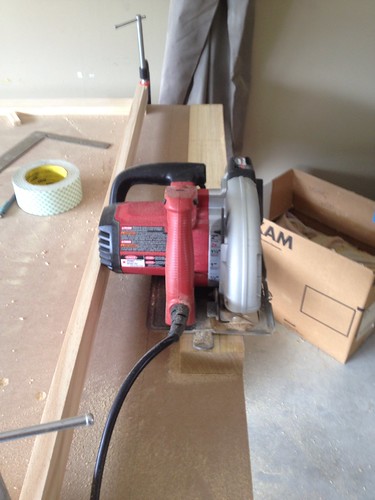


Then the other:


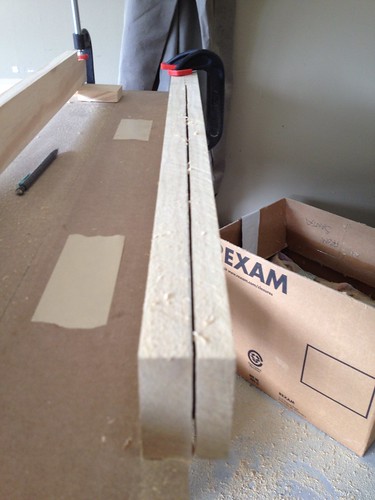
Then I cut the side profile. I marked off enough space to do the heel transition (cut the side profile to the 18th fret) and had to get creative to let me cut the side. My circular saw had enough depth to cut it and I stacked two pieces of lumber that ended up being the same height as my neck blank for a stable surface for my circular saw. I used double stick tape and a clamp to stabilize the neck this time, placing the clamp at a spot that stopped the saw short of the heel transition area.

Here's a picture without the surface for my circular saw (you can see the double stick tape that kept it in place):


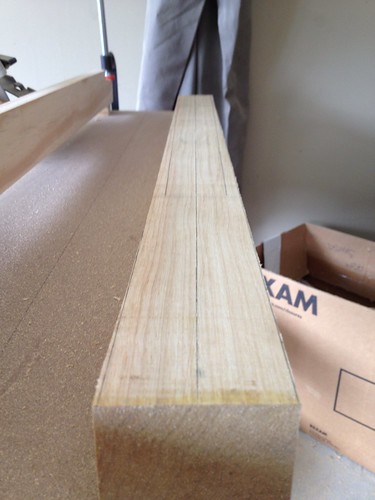
I finished up the cut with my jigsaw and knocked down the high spot it left with my shinto rasp and now have this:


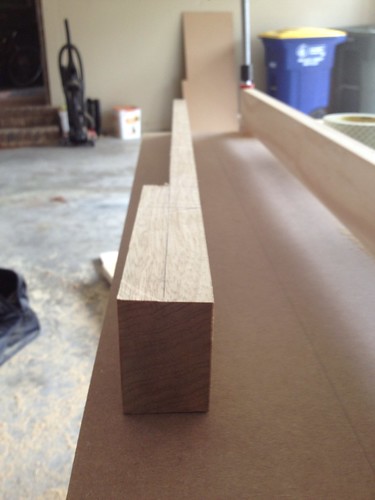
Another picture of the rough cut neck:


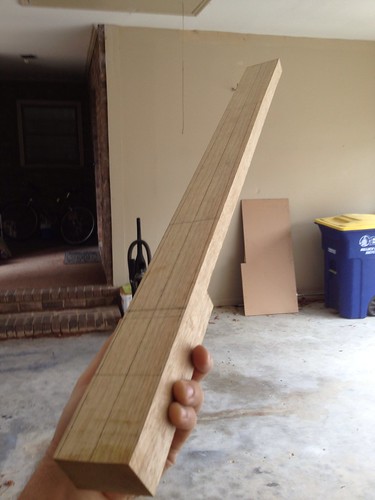
I cut the neck side profile to be a bit over 1-1/8" including the fretboard. That should give me enough thickness to true up the neck and have enough to carve the neck with. I've got it stickered and laying on its side underneath my bed right now, along with the scrap from the blank. The scrap should come in handy as headstock ears. I'll let it sit there for a couple weeks to let it settle before moving on. Next weekend I plan on routing the pickup and control cavities, roughing out the mortise, routing the neck angle in the mortise, and routing the side radius on the body.

I still have a lot to do on the neck. Scarf the headstock, true up the neck, route the trussrod channel, route the sides down to shape (neck and fretboard), install the install the truss rod, add headstock ears, glue the fretboard, carve the neck, install all the fret markers and side dots, and then fret it. WHEW!  :o My goal is to have it ready for paint by the end of April.
« Last Edit: March 17, 2013, 06:28:00 PM by Tugboat »
2012 Taylor GA4
Homemade Ash/Maple Telecaster (Warmoth unfinished body/neck)
PRS Korina Singlecut SE
Homemade 1x10 5F1 circuit Tweed Champ clone

mgap

  • Global Moderator
  • Veteran Member
  • *****
  • Posts: 5767
Re: Home Built Electric: Korina DC Les Paul Special
« Reply #6 on: March 18, 2013, 08:49:52 AM »
This is pretty interesting.  Thanks for sharing the journey.
He who loses money, loses much; he who loses a friend, loses more; he who loses faith, loses all.

Tugboat

  • Jr. Member
  • **
  • Posts: 74
Re: Home Built Electric: Korina DC Les Paul Special
« Reply #7 on: March 24, 2013, 06:09:43 PM »
Thanks! Not sure how many on here play electrics to but thought there might be some. I'm curious about trying my hand at an acoustic if this turns out well. Maybe an OM style build since I seem to prefer OM's to Dreads. 

More progress from this weekend:

More body work while the neck settles. I started by hogging material out for the pickup and rear control cavities with my mini portable drill press tool thingy and a Forstner bit. After hogging out I cleaned it up and brought it down to depth with my new set of Ashley Iles chisels. I have no frame of reference for how sharp they are as these are my first chisels, but even with my ham-fisted attempts at final honing they cut like butter.

My meager family of hand tools:


A close up showing my poor sharpening skills (ordered a guide to help me sharpen as well as a new blade for my #6 Stanley jointer plane).


Hogged out with a forstner bit and one glamour shot with my 1/2" Ashley Iles chisel:


My handiwork after some chiseling (didn't get a picture of the pickup routs). I spent more time after this chiseling the cavities down to a depth where I could finish it up with a router.


I then hit it with the router:


I've noticed a funny thing. I'm nowhere near good with hand tools yet but I do enjoy using hand tools more than power tools. There's just something relaxing and comforting in using hand tools.

I wanted to practice using chisels so I finished off the pickup routes using forstner bits and chisels. These areas will be covered by the pickup so it's a good area to practice. Not too bad for my first attempt. I need to refine my setup and I'll get better results most likely. It's hard to see when setting up the drill down in the cavity. It would probably have been better to do this first then do the outer pickup route.


Hogged out with the forstner bit:


Cleaned up with a chisel:


I spent some time with sanding blocks smoothing up the sides. Here's a mock-up with the pick guard:


I need to spend a bit of time with sandpaper enlarging the pickup routes. Especially the bridge pickup. The neck pickup cover fits but is REALLY tight and the bridge pickup cover doesn't quite fit.

There are a couple divots I need to steam out as well before final planing/sanding and radiusing the edges.

I hope to scarf the headstock, route the truss rod channel, install the truss rod, and glue the fretboard next week.
2012 Taylor GA4
Homemade Ash/Maple Telecaster (Warmoth unfinished body/neck)
PRS Korina Singlecut SE
Homemade 1x10 5F1 circuit Tweed Champ clone

jjrpilot-admin

  • UTGF Owner
  • Administrator
  • Veteran Member
  • *****
  • Posts: 1665
Re: Home Built Electric: Korina DC Les Paul Special
« Reply #8 on: March 24, 2013, 07:07:37 PM »
This is a great thread!  Wow!   ;D
Col 1:15 "that in everything He might be preeminent."
2016 324 (Mahogany top/Tasmanian Blackwood b&s)
2017 Gibson J-45 Standard

jivauk

  • Sr. Member
  • ****
  • Posts: 232
  • Sadly Jimmy lost his fight with cancer 3 Nov 2015
    • singer/songwriter duo, a gentle blend of acoustic instruments and vocal harmony
Re: Home Built Electric: Korina DC Les Paul Special
« Reply #9 on: March 24, 2013, 09:10:53 PM »
Being someone with no woodworking skill, I'm following this with open-mouthed amazement!
Val
www.jiva.co.uk

Guitars: Taylor, Yamaha, Eko
Ukuleles: Kala
Sound System: Bose, AER

JB12

  • Jr. Member
  • **
  • Posts: 88
Re: Home Built Electric: Korina DC Les Paul Special
« Reply #10 on: March 25, 2013, 09:26:25 AM »
I'm not an electric guitar player, but as mentioned above, I am also following this thread eagerly! 

What an awesome project.  Keep at it.  It's looking great.    8)

Tugboat

  • Jr. Member
  • **
  • Posts: 74
Re: Home Built Electric: Korina DC Les Paul Special
« Reply #11 on: March 25, 2013, 01:05:11 PM »
Thanks guys! I haven't built so much as a birdhouse before this so I'm just shooting for something decent looking that's halfway playable!  ;D  We'll see how the rest goes. The neck is the really intimidating part for me and I'll be starting it this weekend now that it's settled for a few weeks after being rough cut.
2012 Taylor GA4
Homemade Ash/Maple Telecaster (Warmoth unfinished body/neck)
PRS Korina Singlecut SE
Homemade 1x10 5F1 circuit Tweed Champ clone

Tugboat

  • Jr. Member
  • **
  • Posts: 74
Re: Home Built Electric: Korina DC Les Paul Special
« Reply #12 on: March 31, 2013, 10:37:13 PM »
Not as much progress this weekend as I would have liked but forward progress was made. Next step on my neck was to scarf the headstock. My first attempt on Saturday was pretty pathetic. So I'm not posting pictures of it. :bonk So today (Sunday) I cut off the scarf, cleaned it up with a chisel, sand paper, and my plane, and squared up and scarfed another headstock piece with some leftovers from rough cutting my neck blank. I marked 15 degrees with a speed square, and cut it with a circular saw.


My first attempt I had a really hard time keeping everything flat and square through the entire surface of both gluing surfaces. So this time I set up a jig to help me route both surfaces to the same angle. Nothing fancy. Cut a 15 degree angle into a couple pieces of pine, squared them both up with a right angle square, clamped them into place, secured the headstock on top of the neck with some double stick tape, and it was ready to hit with the router.

Squaring up the headstock prior to scarfing (and an excuse to show a nice plane shaving picture):


After cutting the scarf:


After Routing:


Wasn't quite perfect so I hit it with a palm sander and finished it with a cabinet scraper to get everything flush. Worked perfectly this time. As A side note, I got a $10 sharpening jig from Woodcraft and used the wetsanding paper on a granite block (a $20 granite side splash from Home Depot) method and that worked perfectly to sharpen my plane blade. My new blade wouldn't work on my old Stanley Bailey (too thick) but starting at #1000 grit on my old plane blade and working my way to #1500 then #2000 worked perfectly. Got a nice mirror finish on the blade and it cut like butter.

Without glue or clamps:


Making sure the neck gluing surface was true:


MUCH better!


This is a picture of my first scarf joint attempt but it shows how I clamped it. Scarfing it this way was super easy. The scarf didn't slip at all once clamped.


This is the scarfed headstock.


I still need to take it down to final thickness ( 9/16"). That will get rid of some of that weird gap. I thought the router would take care of it but after several complete runs it wouldn't go away. It'll be covered with ears and a headstock veneer so after I'll fill the rest of the gap with CA glue and Korina dust so the veneer has a flat surface to glue against then take it down to final thickness (I only have 1/16" till final thickness). Next time I'll leave it 1/8" too thick so I have plenty to remove to eliminate that gap. Everywhere had a nice tight fit except for about 1/8" of a length of one corner. I applied liberally and had squeeze out everywhere but I guess the wood soaked up too much glue in that one corner. I drop filled it with Titebond so there's no gap.

I'm much happier with this headstock. Sometime in the next couple weeks I hope to true up the neck, route the truss rod channel, install the truss rod, and glue the fretboard!
2012 Taylor GA4
Homemade Ash/Maple Telecaster (Warmoth unfinished body/neck)
PRS Korina Singlecut SE
Homemade 1x10 5F1 circuit Tweed Champ clone

MartinD

  • Jr. Member
  • **
  • Posts: 79
Re: Home Built Electric: Korina DC Les Paul Special
« Reply #13 on: April 02, 2013, 07:11:20 PM »
Thanks for taking the time to document the project.  It is very interesting an I can't wait to see the finished results.
Colossians 3:17

2013 Taylor 314 CE
2007 Taylor DN-5
Takamine EF-340scgn
Epiphone Les Paul Standard
UltraSound AG50-DS4 Acoustic Amp
Roland 15x Cube

Tugboat

  • Jr. Member
  • **
  • Posts: 74
Re: Home Built Electric: Korina DC Les Paul Special
« Reply #14 on: May 15, 2013, 09:58:03 AM »
Another update! After letting the neck settle for 3 weeks or so I trued it up, routed the truss rod channel, and installed the truss rod.


I used a chisel and some sandpaper wrapped around a socket to do the truss rod access. Fancy, I know. Then things spiraled a bit. I installed the fretboard dots, leveled them, the. Glued the fretboard on wrong. I tried hide glue but the stuff gives you almost no working time and I got in too much of a hurry. So off came the fretboard. Glued it on again with Titebond, but even though I used finish nails through fret slots to keep everything put the fretboard moved on me. Off came the fretboard again. Third time was a charm. It's still off by about 0.025" on the headstock end (moved on me while clamping) but after consulting with a few luthiers they said I'll be OK. Next time I'll put one finish nail at the 1st fret and a second at the 21st fret to keep everything in place better. I'm finishing the neck along the centerline of the fretboard, not the original centerline of the neck.

All clamped up


I then punched holes in the new (second) fretboard with a brad point drill bit for the fretboard markers to prevent the bit from wobbling around and drilled the fretboard markers. Was gonna install them but I stupidly ordered one dot instead of 12.


Then after time with a spindle sander, rasp, file, #120 grit on a sanding block, a cabinet scraper, I have this:


Still have a lot of work to do. Need to install the fretboard markers and side dots, install the frets, finish the tenon, carve the neck profile, add headstock wings and veneer, and cut the headstock. Not a perfect neck so far but it should come out decently playable.
2012 Taylor GA4
Homemade Ash/Maple Telecaster (Warmoth unfinished body/neck)
PRS Korina Singlecut SE
Homemade 1x10 5F1 circuit Tweed Champ clone